Sunday, February 17, 2013

How to Start Seeds Indoors for an Apartment Garden

Whether you live in an apartment or have acres of fertile soil at your disposal, setting up an indoor greenhouse to start your seeds early can will enable you to get the most of the growing season.  Certain summertime favorites - like vine-ripe mouth-watering tomatoes - require a long warm period into to fruit and yield a strong crop.  And even though last year I thought the prolonged heat-wave would never stop, typically summers in many parts of the country aren't long enough to allow the plants to complete their growing cycle in toto.

Enter the indoor greenhouse.


Not only is it incredibly fun to nurture your plants from the very beginning and to watch them grow into full fledged fruit-bearing adults, it's also giving these plants the time to germinate and grow well before the last frost.  And did I mention it's way more cost effective to purchase a packet of seeds than it is to buy seedlings later on, and, apart from locating a certified organic nursery (again with the $$), the only way to be assured what they haven't been exposed to?  

Seedlings need four things:  soil, water, warmth and light.

Three of those things - soil, water and warmth - are either easily available indoors (warmth) or obvious to even the greenest gardener, so it is the last upon which the successful growth of your seedlings indoors hinges.

Daylight bulbs mimic the color spectrum of light produced by the sun, and thus can be used to germinate and grow your young plants indoors until the weather warms enough for them to be hardened off and moved outside in containers.  Though most daylight bulbs are clearly labeled as such (we found ours at hardware stores and even some grocery stores), you can also double-check the kelvin value located somewhere in small print on the box: 5,600K or 6,400K is ideal.  These lights are "cool" in color, and easily found in energy saving forms.  In fact our new daylight bulbs are probably going to reduce our weekly energy consumption just because they're more energy efficient than our regular ones.

Grow lamps can be used to provide heat, as many seeds need temperatures in the 60s - 70s to germinate, but if you're like me, your home is already in that range, so it shouldn't be an issue provided you keep your plants away from drafty areas and cold windows.

As you can see, our set-up isn't the most photogenic, but it works.  Using an assortment of thrift-store lamp finds and compact fluorescent bulbs we've been growing tomatoes, cucumbers, lettuce and a variety of other heirlooms in our small apartment bathroom since January. 


You want to ensure that your lights are positioned 2-3" above the spouts like you see here.  Plants will grow long and leggy trying to reach a strong light source, investing their energy into stems which will either topple over or die, rather than into new leaves.  This is probably the most common problem growing plants indoors, but can be prevented by strategic placement of your lights.

So, what does your set-up look like?  Let me know in the comments below..


Saturday, February 16, 2013

Fresh Year, Fresh Start

So I think it's safe to say I'm not a prolific blogger.  But no excuses.  As I said, "Fresh Year, Fresh Start."


Oh yes - and I got married!  In a lovely ceremony full of vintage touches, naturally.  That, and a new job, has dramatically impacted my ability to update this space with the latest and greatest of time-tested kitchen treasures (though they continue to filter through our Etsy shop, as always).

As we've settled into our married life, we've both firmly decided that one of the things we dislike most about being renters is the inability to have a garden.  We've lived in some amazing spaces over the years - a cozy walk-up in Manhattan, a converted tobacco warehouse loft in Kentucky, an quasi-subterranean apartment within walking distance of Seattle's best lookout - but the one thing we've never had is a garden.  Heck, the closest we've come to a patio is a fire-escape.  This year I am determined to remedy that.

Apartment gardening can be accomplished with a little ingenuity.  We converted the underutilized space in our bathroom into a greenhouse.  My penchant for hot showers keeps the temperature and humidity slightly warmer than the rest of the house - perfect conditions for seedlings and young plants.  And on these dreary winter days, a shock of green really does help me keep my sanity.

If you've ever considered starting your own plants from seeds - do it!  It's not at all as difficult as you might think and in fact, this is the time (in the northern hemisphere anyway) to start thinking about your garden.  I got an early start because I simply couldn't wait any longer (we'll see how that works in the long-run) but this means you can follow along with the blogs and be right on pace for spring and summer harvests.

Nature is pretty forgiving provided you have all the basic ingredients; survival of the fittest indeed!  As they say, the grass is greenest where you water it. 

Stay tuned for the next post: How to Set Up an Indoor Greenhouse


Saturday, June 16, 2012

Four-Hundred Miles of Vintage-y Goodness

Every year in June, residents along the scenic Highway 68 running through Kentucky and into Tennessee hosts the grand 400-mile Sale.  Mile upon mile of booths, tables, front yards and sidewalks all be-decked with antique wares, vintage finds, personal items and a fair-bit of junk (for good measure) up for grabs.  A veritable smorgasbord of possibility!   

Oh yeah, and to make it better, Hwy 68 looks like this:


It meanders through picturesque fields of bluegrass cordoned off with historic stone fences, traversing the Kentucky River palisades, passing through farmland and nearby Civil War battlefields, all connecting a ribbon of small historic towns. 

 Definitely not the worst way to spend a weekend.

Naturally, at such a heavily publicized and trafficked event its the good stuff goes quickly.  It's an early-bird-gets-the-worm scenario.  The soonest we could head out was Friday afternoon (it started Thursday), just in time for the weather to turn suddenly nasty.  Fortunately we were rewarded with one of our better finds of the entire weekend from the fairgrounds in Nicholasville (more on that soon).
 

We made it from Lexington down to where Hwy 68 intersects with I-65 (about 140 miles).  With all the stopping, pulling over and slowing down I'm not sure how anyone could cover the entire route in four days

The 400-Mile sale runs the first weekend in June - so if you didn't make it this year, you have plenty of time to plan for 2013.

I wanted to take great little snapshots of all our treasures, but with moving and work I just haven't gotten around to it.  Rest assured there was tons of vintage kitchenware (along with loads of vintage luggage).  But never fret, I'll leave with you a little sneak-peek at what's to come:


Thursday, May 17, 2012

Reunited (and it feels so good)!

There are numerous good reasons to enjoy vintage kitchenware.  There's the knowledge that you're re-purposing and recycling items discarded before their useful lifetime and the understanding that your money is filtering through the economy on a different, sometimes even charitable, level.  There's the daydreams you can easily get whisked off to thinking of the former meals your skillet has cooked or dish has prepared.  And the thrill of the hunt, for sure.  But I get the most extreme pleasure when I piece back together a long torn apart set.

Sometimes while anthropomorphizing my dishes, I think about how lonely a misplaced bowl is separated from its manufactured brethren.  I just want to swoop in and say, "Ah ha!  I have found you!  Let me return you to your kinfolk."  And sometimes I get to.


When it comes to glassware, sets of three are always hard to think about.  I can't help but wonder what awful fate the fourth succumbed to.  Did it break?  Maybe it was lost in a move?  A while back I'd found three colorful automobile glasses: red, turquoise and yellow.  They were bright and cheerful, and scattered throughout an unmanned flea market booth about to close.  Lo and behold if I didn't spot the green one months later and miles away.

Big news too that I also finally completed my set of 1940s Pyrex Primary Bowls with the old elevated foot.  I suppose the italicization goes a bit far - I mean I haven't been looking that long.  But anyhow, my very first set back together at last:


When it comes to reuniting sets, I think it is part luck and part patience (and honestly, I think more of the latter).  I'd known of a yellow #404 for a while, but wasn't entirely pleased with either the condition or the price.  I'd walk by it thinking, "There you are, the last piece needed to complete this set" but had managed, for weeks, to pass it by.  Finally I gave in to temptation and splurged on the bowl, reckoning it's a decently elusive find what with the limited production and age and who only knew when I'd see another one.  So I bought it.  And my jubilation and rationalization lasted all of something like three hours until at the next place we stopped, I found another one - reasonably priced, and in better shape (so yes, I rescued that one too.  I know, I can't help myself - luckily that first one has already been re-homed to Japan so I can mark a tally in the win column for spreading the Pyrex wealth).

Just goes to show - patience always wins out.

Then you have lids.  Oh lids - you bane of my existence.  They say there is a lid for every pot but they don't tell you where this lid happens to be.  I broke my rule and purchased this Zodiac lid online, but seeing how happy he is (I think this casserole is a male, no?) back with his proper hat, I understand why rules are meant to be broken sometimes.


This little casserole didn't lose it's lid, but the one it had was all chipped and damaged.  Fortunately, not one but two lone lids were discovered a few days ago for a steal.  It's just one big family reunion going on over here!


So tell me, what's your happiest reunion tale? 

Thursday, May 10, 2012

The Man(Power) Behind the Curtain: Or, How to Clean Your Vintage Dishes

I have determined that, as much I dislike them in theory, I am the type of person who needs deadlines. Erm, maybe "deadline" is too strong a word. But I need goals. Benchmarks. I need some form of structured accountability because this, "What I prioritize will get done first" mentality is simply not true. I blame it on the fact that I simply too good at rationalizing things. It is a trait of all productive procrastinators I truly believe.

I started this blog entry back in February.  I don't mean middle-to-late-oh-it's-almost-March February, I mean, "Oh gee it's no longer January" February.  But (and this where there the adept rationalizing begins) the timing now seems appropriately apt.  That's right.  It's time for Spring Cleaning!  Or at least, time for me to write about it. 

See I do a lot (constant, endless amounts) of dish-washing. When I was a child I used to think doing the dishes was such drudgery. I mean you had bend down to put them into the dishwasher, and then bend down again to take them out! Heaven forbid they don't come clean because then you'd get interrogated about whether or not you rinsed the darn things ahead of time. Goodness gracious! Life was so unfair.

Then I grew up and out onto my own. Turns out affordable apartments in major urban centers like Seattle and New York don't even have dishwashers. Oh wait, yes they did. Me. Even when I've lucked out to live in a place that has an automatic dish-washing appliance, it breaks. Like right now. A perfectly good dishwasher downstairs, but the sink is all sudsy soapy and the dish-rack is full to the brim.


Why? Because I am meant to wash dishes. Also because of issues with the landlord/appliance repair people but lets not go down that road. Point being, you can trust me folks. Lest my impressive experience above wasn't enough to convince you, let me remind you I've been a professional. I know what I'm doing.

This is all only partially in jest, for as simple a concept as washing the dishes is, washing 
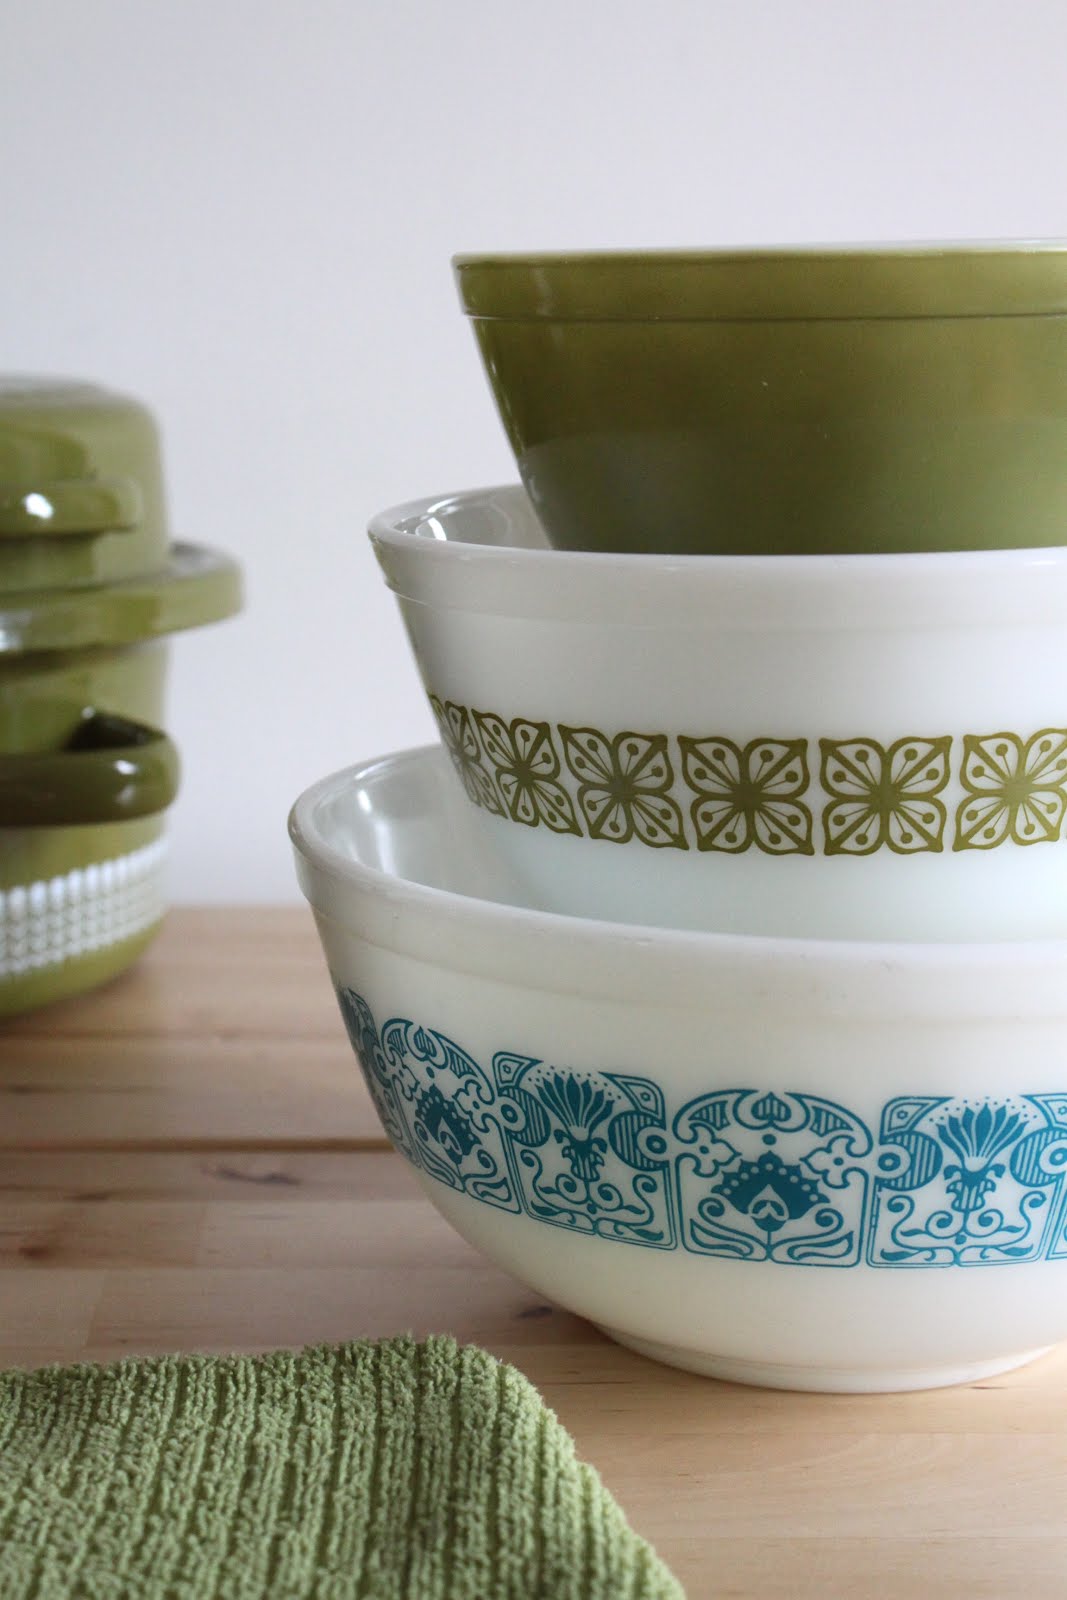
vintage dishes becomes a trickier matter. Case in point: that automatic dishwasher sitting empty downstairs? A death trap for retaining the value (aesthetic and otherwise) of your Pyrex pretties and other cook and bakeware. Decals, enamel, colorful glazes - these are not and have not always been dishwasher safe. Such rampant abuse has even led to the term - and subsequent acronym - DWD: DishWasher Damaged.

I can understand the temptation to give the dishwasher a go when a bothersome stain or burnt-out something or other just won't come off despite your best efforts, but please do refrain. And by all means, I find nothing more sad than letting lovely bakeware sit there unused and unloved out of fear that if it is used, it will never get clean again. That defeats the point of kitchenware altogether.

Now... this is the part where I'd whip out some stunning before & afters, and share the secret of how I did it. That was the plan. Of course I forgot that the key to successfully execution of said plan required pictures taken before I clean everything. Oops. But I told myself I would do this today. Not tomorrow. Certainly not next Thursday (see how easily I could justify putting this off?).  So those will have to wait.  We're moving.  I hope you don't have to wait too long.  But without further adieu, here are my kitchen cleansing secrets. 

To start, my most invaluable man behind the curtain is:

An actual man, whose elbow grease and attention to detail in matters of dishware is something all woman everywhere should be jealous of. Unfortunately (well, fortunately for me), he's mine and I don't foresee the idea of renting him out to scrub your pots and pans getting very far off the ground. I know, I know. This is unhelpful, but I did have to give him his due acknowledgment for being particularly proactive in the dish washing department.  Moving on.

I'd like to introduce the supporting cast of characters that make this blog possible. Always lingering backstage, the spotlight seldom shines on these stagehands but that does not make their contributions any less important. 

The key to cleaning vintage dishes is knowing which product to use when, and how.

Step 1:  Clean in warm, soapy water
I always start with a good warm-water sudsy bath.  This gets rid of all the physical dirt, dust and residue.  There is no use wasting a fancy product (or money spent on such fancy product) on a task easily performed by soap and water.  I prefer to use scrub sponges, but a dishrag would also work just fine (although you might have to work a little harder). 

Step 2:  Remove Grease and Built-Up Grime
This is where Dawn Power Dissolver comes in handy and it works like a food-safe oven cleaner.  Let your dishes dry, then target any areas of grease and baked-on who-knows-what.  Now walk away.  Read a book.  Drink some tea.  How long is too long?  Usually 5-10 minutes will do the trick, but I've allowed the stuff to work its magic for at least a half an hour or more (okay, so I forgot about it).  Then watch as the residue of all that former meals magically wipes away.  In cracks and crevices (particularly along the rims of certain casseroles) I find that an electric toothbrush or toothpick is extra helpful at nudging the grime away.  Occasionally, like when there are layers upon layers of blackened gunk, several applications may be necessary.

Step 3:  Scrub Away Stains and Markings
With all the dirt and grease removed, it's time to tackle the overall exterior with the Magic Eraser.  Be forewarned - even though this appears like a soft sponge it really is an abrasive cleanser, so just be aware.  For most pieces covered with a generalized dingy markings, a good once-over with Magic Eraser will erase them right away.  In some ways, I think of this as "polishing."

Step 4:  Metal Marks
By now, your dishes should be well on their way to looking like new, but if they were heavily used (or stored next to something metallic) you might still be looking at metal marks.  This requires pulling out the big guns - Bar Keepers Friend.  BKF is an abrasive cleanser, so while it works marvelously on ceramic plates, milk glass and the inside of Pyrex, use extreme caution when using this on patterned areas and generally avoid it entirely on cast-iron enamelware.  That said, sometimes metal marks can be so ugly or distracting,  minor wear cause by BKF  might be a worthy trade-off - that's for you to decide.  Sprinkle a little BKF on the affected area and dampen, forming a paste.  Let it sit for a few minutes and then gently scrub away.  I use the soft-side of a scrubby sponge. 

And voila!  Like new vintage dishes  I'll try to get some before and afters up shortly.  In the meanwhile, happy spring cleaning!

*Disclaimer, disclaimer!  I've used these products and techniques on any number of colored Pyrex dishes and a variety of other decorated glassware and never had any issue with patterns being damaged.  That said, I'm not liable for your pieces if something goes amiss. I hope it doesn't - and it probably won't - I'm just saying.

Tuesday, February 14, 2012

My Heart Beets For You

First of all, a confession. I like to play with my food. I like to have fun with food. And I think engaging with food is one of the most interesting and enjoyable past-times possible. I mean, it's okay. You can say it. I'm a food nerd. Goodness, I mean I've got the credentials for it; there is no use shying away from it now.

So when I saw this:
I think my heart just skipped a beat (or should I say, "a beet"). I love it! Mrs. Stella Gilbert, you are one witty lady. I knew I had to share it because if you're like me, the only thing you like more than an ingredient is a clever play-on-words.
Do you care at (carrot) all for me, for my heart beats (beets) for you and my love is as soft as a squash but as strong as an onion. For you are a peach with your reddish (radish) hair and your turned up (turnip) nose. You are the apple of my eye, so if we can't elope (cantaloupe) then let us (lettuce) marry anyhow, for I know we would make a happy pair (pear).
This also got me thinking about another food-related project I've been wanting to try recently. Perhaps you've see them:


Wait, are those ...? Oh you mean bacon blossoms? Pork petals? Broses? Why, yes. Yes they are. Because, you know, sometimes you see an internet meme and think, "If I see one more cat wanting a cheeseburger I am going to scream." Other times you realize you should probably make your fiance bacon roses for Valentine's Day. Potayto, potahto. They were surprisingly simple (albiet time consuming) to make. Don't let the ridiculous directions online which require to you take an electric drill (?) to the base of a muffin tin (?!) deter you. I used one of my vintage Pyrex #414 prep bowls as a mold and lined it with foil. I assure you it is much easier to poke a hole in the base of an aluminum foil cup than it is into a metal mini-muffin tin (say that ten times fast). No power-tools involved.

The rest of our celebration was fairly rote, but I found it the perfect excuse to use a whole assortment of thrifted vintage finds I usually find a bit too overly-feminine. A stunning set of Hazel Atlas Pink Crinoline plates, milk glass vases, shabby-chic assortment of various plates and pieces of our Diane china.


Now don't tell me grown-men don't like breakfast tea-parties (the key to success is a pot of Earl Grey) - I think he loved it. Happy Valentine's Day everyone.

Thursday, February 9, 2012

"Orange" You Glad You Met Me

Last night I dreamt I stumbled across an entire collection of orange kitchenware. Seriously - that is what was flickering across my subconscious mind at around 3-4am. At some point, as I was loading up a cart with pumpkin colored pots and pans, carrot orange casseroles and flaming cast-iron, I thought to my dream-self, "Just because it's all the same color, doesn't mean you have to have it if it's not something you want."

Naturally, when I woke up this morning I wondered what it meant. What deep and mysterious truths and occurrences did this dream foreshadow? If I go out thrifting today will I actually run-across the ruddy-colored compatriots of my turquoise motherlode?

Then I took a look around:

Turns out I have a lot of frickin' orange laying around the house. And that doesn't even include the awesome tangerine spring day-coat I snagged for half-off (!) at a vintage clothing-store the other day. The strange thing about all this, though, is that up until very recently orange was perhaps one of my least favorite colors. Right up there with pepto-bismal pink and princess purple (rendered exponentially hideous when used together). Orange things I liked included: oranges. pumpkins. cheddar. monarch butterflies. That, my friends, is not a very long list. And it certainly doesn't include snack bowls, and tea-towels, and coffee cups, canisters and clothing. What happened?!

It would be all too easy to say I have merely fallen victim to Pantone's Color of the Year, which is, in fact, a bright, terra-cotta-esque "tangerine tango." But that would imply I have the ability to keep up with trends, which a look inside my closest clearly indicates that I do not (unless navy blue, cream, and grey cardigans are coming back in fashion. Please please please!). No, I blame it on these:
Well, the top two anyway. We had discovered a new estate warehouse that offered online bid-auctions as well as in-person sales once monthly. So a cold, brisk winter morning we lined up outside the opening and as the door opened, I saw these. Can we say, "bee-line?" Both the flame pieces are Le Creuset, the sunny yellow is an early Descoware. All are in ridiculously good shape but the orange pieces looked brand new. Maaybe, they had been used once. Maybe. In fact, so new that I don't even think they qualify as vintage. But that's okay, because the reason I love vintage kitchenry as I do is because it is timeless.

It did give us slight pause as to what to do with them though, because they weren't suitable inventory for the Etsy shop and up until this point our kitchen has always been a shade of chartreuse, apple-green (always. Since the time I moved out of the college dorms and had a kitchen, and every kitchen we've had together since). Then of course, we added the turquoise/aqua blue because you don't look a gift-horse in the mouth and then complain about the color. Moot point anyway because green Le Creuset wasn't even offered in the early years.


I would really love to have some baking dishes though, and I'm positive I'll be holding my breath a long time waiting to locate those in original Paris Blue or affording to buy kiwi pieces retail.

So it has now been decided - our kitchen colors are turquoise/aqua blue, chartreuse/apple green and bright orange! Drum roll.....


What do you think?